Sunday, February 13, 2011

Winter chili

I made this soup with a friend. It came out of a cookbook she had from the library, with some ridiculous title like "Eating well on a budget." I was not hopeful. As it turns out, this is now perhaps my favorite soup. We call it "winter chili" because it uses butternut squash as its base (a winter vegetable at our monthly farmer's markets) rather than tomatoes (summer staple). It also gets so many kinds of vegetables into me at once, in a season when I a bit thin on vegetables in my diet.

You can add or remove vegetables as you like. For example, we also made this adding celery or celeriac with the carrots at the beginning and with frozen corn added at the end. The soup is perfect served with some bread. It’s very hearty and leaves you full for quite some time! My friend also waited to add the red pepper flakes and blended it up as baby food for her son. It was a hit among all generations!

Ingredients:
2 tablespoons butter
1 onion, chopped
4 carrots, chopped
3 cloves garlic, minced
6 cups stock
1 can of tomatoes or 1 chopped tomato
1 medium butternut squash soup, chopped
1 can kidney beans, rinsed (also tested and approved with chickpeas and black beans)
10 ounces of kale, spinach, chard, or other bitter greens, chopped
crushed red pepper
salt and pepper

Cooking:
1. Saute the onion, garlic, and carrots until onions start to brown, about 5 minutes.

2. Scrape the sides of the pot, and add the stock. Add the butternut squash and crushed red pepper. Bring to a boil, then reduce to a simmer for 20 minutes, or until squash are very soft and starting to fall apart.

3. Remove about 3 cups of the soup and blend it or food process it. (This makes the soup thicker; we use an immersion blender to avoid scalding, which I highly recommend if you own one).

4. Add the beans and kale. Cook until the greens are wilted, or about five minutes.

5. Add salt and pepper to taste.

Read More...

Saturday, January 22, 2011

The Thing About Friendship (Bread)

[Photo credit: Joel Straus]

Is that it can be a lot of work. In early November I got this email from a friend:

"Would you be interested in getting a starter for this Amish Friendship bread that I'm making tonight? I'll have a batch of starters to give away starting tomorrow, and it's really tasty and easy (instructions come with), so let me know."

Sounded easy enough and like a fun adventure, so I thought what the heck, and I took a bag of yeast. I did not really know what I was getting myself into. You have to "mush" this bag every day for 10 days and then on day 6 you have to add some stuff to feed the yeast. And then on day 10 when it's time to bake, you have enough to bake a whole cake (that's the other thing, this "bread" is really cake) PLUS 4 starters to give away (or 3 to gift 1 to keep).

The first round of starters I gave away all died because my friends did not care for them. (I'm hoping the inability of my friends to care for friendship bread is not an actual reflection on any of our friendships.) And in the second round I think only 1 starter got the treatment it required.

After 3 rounds, this friendship-bread thing was starting to stress me out. So at the end of the last cycle, I cooked all of them (except one starter that I froze for a later experiment), looking for as many variations as I could find. And this week I pulled out a frozen carrot cake from my freezer, frosted it (while it was still frozen, for the record), and served it at a little gathering. It was so good it almost made me miss having the secret ingredient constantly growing on my counter.

Anyway, I feel a little bad sharing this recipe because you cant make it without the yeast, but since this appears to be somewhat common I'll share my variations and assume that one day you all will find yourselves with the veritable baking chain letter that is Amish Friendship Bread. Although, I guess there are recipes on the web to make the starter, so it's not really that much of a secret.


Here are some "Important notes" that came with the bread.
1. The bread starter will come in a gallon size bag. This works well because it gives you enough space to add the ingredients later on.
2. Do not use any metal bowls, pans, or spoons when mixing (but you can bake it in a metal container).
3. Do not refrigerate the yeast.
4. The yeast will make a bunch of air bubbles in the bag, especially after you've done your mid-cycle additions. Make sure to let them out, or the bag will explode.

And, here's what to do for the 10-day cycle.
Days 1 - 5: "Mush the bag." I don't really know what this means. I generally squished it around in my hands for a minute or so.

Day 6: Add 1 cup flour, 1 cup sugar, and 1 cup milk to the bag and mush it together. Don't refrigerate, even though there's milk in there. It will be okay, I promise.

Days 7 - 9: Mush the bag. Same as days 1-5 but it will grow more since you just fed it, so make sure to let the air out.

Day 10: Bake your bread and make your starters by following the instructions below.

Instructions:
1. Pour the entire contents of the bag into a non metal bowl, and using a wooden spoon, add 1.5 cup flour, 1.5 cup sugar, and 1.5 cup milk and mix well. Note: a lot of the recipes I see on the web say to add only 1 cup each of these things. I always did it according to these rules and in the end I always had around 5 1/2 cups of yeast at the end, so 4, 1-cup starters and 1 1/2 to make the bread. This seems wrong because most of the recipes online only call for 1 cup of starter, but I'm not going to question it because it worked well each time. That said, I wouldn't call the whole process exactly scientific, so I wouldn't fret too much about it.

2. Make your starters to gift away or keep for yourself for another cycle by adding 1 cup of the mixture to 4 separate gallon-sized ziplock bags. Make sure you write when Day 1 is on the bag.

3. Preheat the oven to 325.

4. Make your batter by adding stuff to what's left in the bowl. Add:

3 eggs
1 cup oil (or 1/2 cup oil, 1/2 cup applesauce)
1 cup sugar
2 tsp. cinnamon
1 tsp. vanilla
1 1/2 tsp. baking powder
1/2 tsp. baking soda
1/2 tsp. salt
2 cups flour
1 large box of instant vanilla pudding

5. Grease your dish. This is enough for two loaves or 1 bundt pan. Then dust the bottom of the pan with a cinnamon sugar mix (like you would with flour to keep something from sticking to the pan). Bake for 40 minutes in a loaf or 1 hour in a bundt. These baking times are really approximate. I found that all the bundt variations took a little longer. Start checking at 40 minutes. It's done when a knife comes out clean.

And finally, some variations:
1. The first variation I made was pumpkin (pictured above). Instead of 1 cup of oil I used half a cup, and then I added 3/4 cup of canned pumpkin. I also substituted the cinnamon with 2-3 teaspoons of Penzy's pumpkin-pie spice. I started with only 2 and then added more until I found that the batter tasted sufficiently spicy. The glaze is a classic cream-cheese frosting, thinned with warm milk so that it could be drizzled like a glaze.

2. The second variation I made was banana. Instead of 1 cup of oil I used half a cup and 3-4 mashed bananas. I think I just used how ever many I had in the freezer. It was really good. Up there with banana cake.

3. And then I made biscuits. They were terrible. Okay, not terrible, but my immediate response to them was "I would not serve them to my friends and admit that I made them." So, I will spare you that recipe. Suffice to say, if you ever find yourself with friendship bread and are looking around on the web for variations, don't trust ones that say they will make biscuits.

4. And finally, carrot cake. Reduce oil to 1/2 cup and add 3 cups of grated carrots. Because I still have it, I used 1 teaspoon of pumpkin pie spice in addition to the 2 teaspoons of cinnamon. Also, I made the carrot cake in two 9 inch silicon pans and frosted them with cream cheese frosting. Man, it was good. For the cream-cheese frosting: (1) 8 ounces cream cheese, (2) 4 tablespoons butter, (3) 1 teaspoon of vanilla, and (5) sifted powder sugar. I started with 4 cups and then added a little more until I was happy with the texture.
Type the rest here

Read More...

Wednesday, January 19, 2011

Carrot Soup!

Since the new year, my bunny rabbit has been on a strict greens and hay diet. This has resulted in me buying a lot of young carrots in order to obtain the (delicious for rabbits) carrot tops.  (Imagine a picture of an adorable bunny eating leafy greens here, or not.  The choice is yours.)

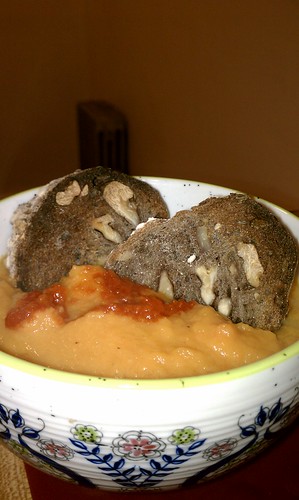
This week, with a slight cold after a rainy weekend, I realized that a simple carrot soup was in order. I was pleased and delighted to see 101 Cookbooks turn up in my google search for carrot soup, and sure enough, Heidi Swanson's recipe was simple and delicious.

IMAG0016.jpg


With a little harissa on top, this soup was flavorful and quick, and the perfect accompaniment to some toasted walnut bread. Yay soup!

Read More...

Sunday, September 5, 2010

first and last cooking of the summer

I've been pretty routine in my eating this summer. Sticking to a few standards has made grocery shopping really easy but it hasn't made for a lot of variety. (Ask CH: "Uh, I can offer you a salad with, uh, shrimp and tomato and avocado, or, uh, a sandwich with cheese and tomato and avocado. Oh! Or berries and yogurt!")

So I decided to commemorate the honorary end of summer with making a meal that not only required creative shopping, but also required cooking two foods I've never cooked before. And, uh, it was totally worth it.
I started with this recipe for Corn, Bacon and Clam Stew. Out of the usual necessity, I replaced the bacon with turkey bacon. And since I failed to check whether I had bourbon, I had to find a replacement for the bourbon, too. (I know: I was also shocked. I didn't even think to check, but, after digging through every cabinet in my kitchen, I remembered that the last time I was in the wine store I thought, 'Oh, I need bourbon,' and then managed to forget to buy any. I plan on remedying this as soon as the blue laws will let me.) For half of the recipe, I substituted some old Pumpkin Ale and, for half, I substituted Vermouth. I think the Vermouth was actually more successful, although both were fine.

I've never cooked turkey bacon or clams before and I was surprised at how easy the clams were to cook. (Turkey bacon is another story. It took forever and made a huge mess.) The other big surprise was how much the basil added to the stew. Honestly, I tend to think that basil is superfluous in most recipes and I expected to think the same of this. (Read those ingredients and tell me that you think the basil sounds like it fits.) But it really added brightness to the stew so I was completely won over.

Of course, being me, I doubled the recipe since it looked like it would be a pain to make. So I've got plenty of leftovers to see how well this reheats. Depending on how much I enjoy it through the week, I may try to make it again before all the summer corn is gone. I think it's plausible that it could be made without the turkey bacon, or at least with a lot less, and I feel pretty confident that I could substitute shrimp or white fish for the clams. If I actually end up doing so, I'll let you know how it goes.

Read More...

Sunday, July 11, 2010

A Killer Chocolate Cookie

I have had a couple of dinner parties this summer. And one common theme in the foods that I have offered has been these amazing chocolate cookies.

The first time, I made them to look like this:


(Those are ice cream sandwiches, one with vanilla and the other with homemade strawberry sorbet. I thought these were really good, even better after they'd been in the freezer for a day.)

And the second time, I did just what Deb told me to do and made these:

Pretty much all critics agree that these are delicious chocolate cookies. They're very sweet, and they spread a lot in the baking process, but in all they are the star of this show. As for the oreo filling, I and most people agree that it tastes pretty much like the original "white stuff" though at least one taste tester agreed with Deb's assessment that, when combined with the cookie, the overall package was too sweet. Deb says, lower the sugar if you're using the cookie to make oreos. I'm not sure that's the route I'd take, but I am not afraid of a sugary cookie. Moral of the story, less sugar or no, this is a great versatile chocolate wafer cookie that is easy to make and sure to please.

Read More...

Sunday, May 30, 2010

raw rhubarb does freeze well!

I'd bought some rhubarb at the beginning of the month but didn't have time to make anything out of it. Ms. CAM kindly cut it up and put it in my freezer, awaiting a three-day weekend (and didn't even mention that most hostesses don't ask their guests to prep and freeze food for later consumption). In between then and today, Smitten posted rustic rhubarb tarts. So, thanks to both CAM and Smitten, I've enjoyed two today and am trying to stop myself from enjoying my third. Not that I've ever been picky about my rhubarb, but this recipe is definitely a winner.

I followed the by-hand directions, because I also dragged Ms. CAM around central Connecticut trying to track down a pastry blender (for the rhubarb pie that she never got to eat). Apparently, multiple Williams-Sonoma stores haven't been able to order pastry blenders quickly enough to meet demand. I managed to snag the last one at Macy's, though, and it was worth it. No more cutting in butter with two knives for me!

I modified the recipe a little because I didn't have corn flour and didn't feel like tracking it down just for 1 cup. And I did have about 3/4 c. graham flour and thought that its sweetness would work well with the rhubarb. I replaced all of the corn meal with graham flour and the corn flour with 3/4 c. regular flour and 1/4 c. graham flour. The crust may have turned out heavier, but I've got no complaints.

Read More...

Monday, May 10, 2010

Black Forest Biscotti

Back in the good ole days when life was simple and I lived with EW, I gave her a cookbook from Moosewood Cafe for her birthday. And, as good roommates do, she thanked me in the form of baked goods and wholesome meals. Many times. Maybe I have a selective memory for cookies and other sweet things, but I do not remember anything from that cookbook as delicious these biscotti. So, recently when I was craving sweet treats to pack in my lunch that are not completely filled with butter, I asked her for the recipe. They delivered big time. They are crunchy and sweet, but not too sweet. And since the recipe is low on butter, I didn't feel (completely) guilty when I had one every day for lunch.

Adapted from: Moosewood, via EW

Ingredients:
½ cup dried cherries
1 cup water
¼ cup butter, room temperature
¾ cup sugar
2 eggs
1 tsp almond extact
1 tsp vanilla extract
½ cup semisweet chocolate chips
2 cups + 2 tablespoons flour
1/3 cup cocoa powder (unsweetened)
½ tsp salt
1 ½ tsp baking powder

Directions:
Preheat oven to 350 F. Lightly oil a baking sheet.

In a small saucepan, heat the cherries and water just to boiling, and then remove from heat and set aside. In a bowl, cream together the butter and sugar until light and well-combined.

Blend in the eggs and almond and vanilla extracts. Fold in the chocolate chips. Drain the cherries, place them on a paper towel to absorb any extra moisture, and then stir them into the egg mixture.

In a separate bowl, sift together the flour, cocoa, salt, and baking powder. With a rubber spatula, fold in the wet ingredients until the dough is uniform and holds together when pressed lightly with floured hands.

Use the spatula and your floured hands to scoop the dough onto the oiled baking sheet. Form the dough into a 12-inch by 3 inch diameter log shape; then press down on the log, flattening it to a thickness of about an inch. The length and width should be about 14 in x 4 in.

Bake on top rack of the oven for 25-30 minutes, until dough is firm and just slightly brown.

Remove from the oven and transfer the log to a cutting board. When cool enough to handle, slice crosswise in ¾ in pieces. Lay each biscotti cut side up on the baking sheet. Bake for about 5 minutes on each side, using tongs to flip them. Cool completely on a rack and then store in an airtight container for up to 2 weeks.

Other notes:
EW says to add almonds. I would have but I didn't have any. I also forgot the chocolate chips, so I just added more cherries instead. Also, I think I probably undercooked these on the first round.

Read More...